
Connect the desktop app to external services and workplace systems.
By default, QwenWork completes tasks for you within conversations. But real work doesn't happen only in the chat box — you also need to look up web pages, check your calendar, and handle email, and in the workplace you'll also use collaboration platforms such as DingTalk. Connectors are the bridge between QwenWork and these external systems: once enabled, the AI can operate your browser the way you do, read and write your system calendar and email, integrate with Microsoft 365, and complete common workflows such as To-Dos and daily reports in DingTalk using natural language.
Without Connectors, QwenWork can only handle conversations and local files; with Connectors, it can help you get work done across apps and systems. QwenWork offers multiple ways to connect to external systems. All Connectors are configured and managed in one place under Extensions → Connectors in the left sidebar, and fall into two main categories:
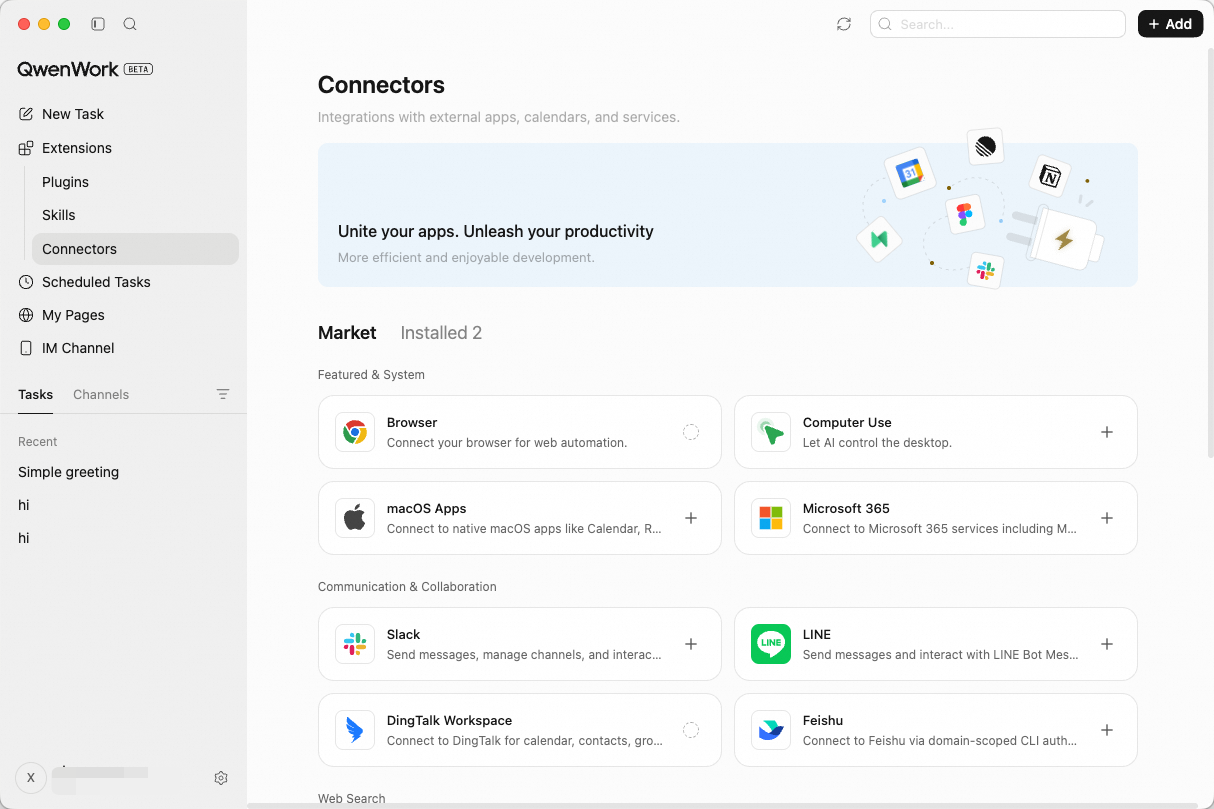
In the in-app marketplace, you can install and connect enterprise collaboration platforms and third-party SaaS tools with one click. Integrations in the productivity section include DingTalk, Feishu (Lark), Notion, Linear, Todoist, Canva, Supabase, Vercel, Neon, Slack, Figma, Google Calendar, Google Maps, LINE, Qichacha, and more.
All Connectors are turned off by default. QwenWork gains the corresponding access only after you explicitly complete authorization and configuration.
Browser lets QwenWork control your browser — opening pages, clicking buttons, extracting data, and filling in forms.
Much of daily work involves repetitive operations in the browser: logging into a back-office system every day to export data, checking competitors' prices on a regular basis, or copying information back and forth between multiple pages. These tasks aren't difficult, but they are time-consuming and error-prone. Browser lets you describe what you need in a single sentence, and the AI completes the entire workflow automatically.
1. Install the browser extension
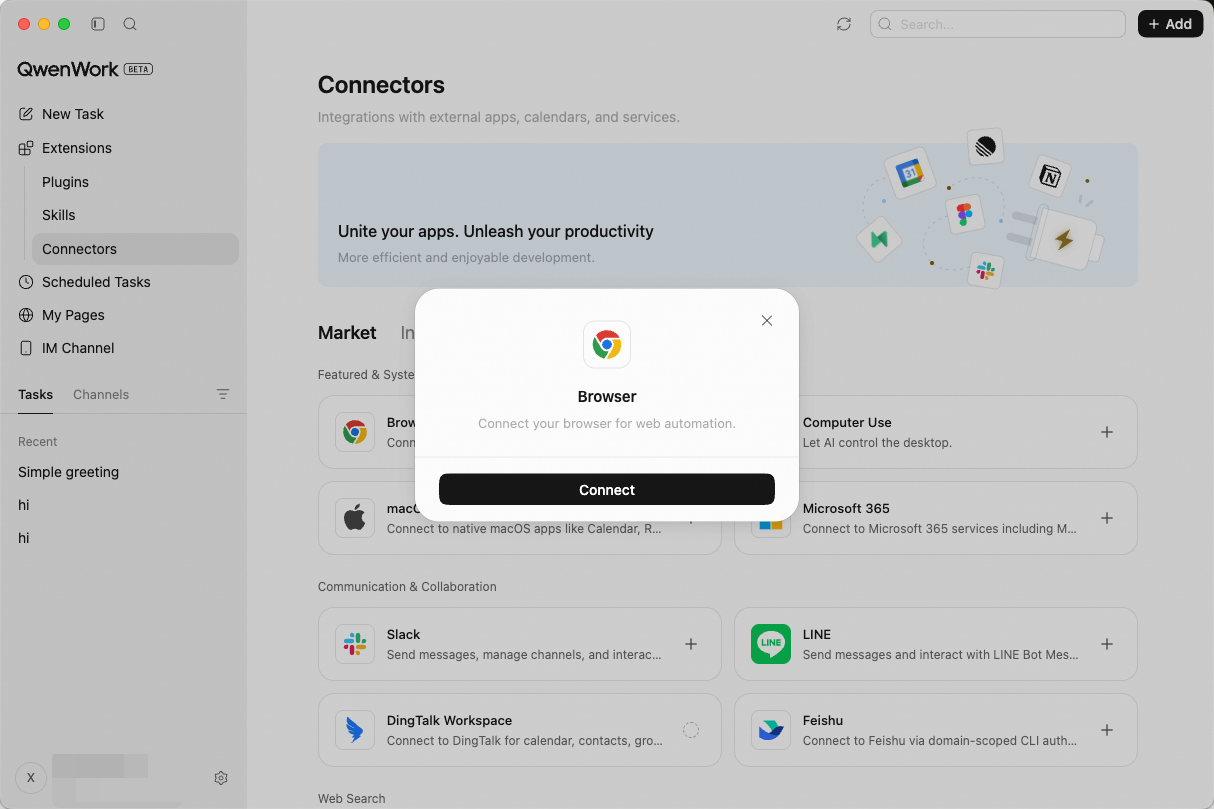
Under Extensions in the left sidebar, click Connectors, find Browser in the recommended list, and click +. When the dialog opens with the status Waiting for extension, click Install from Chrome Web Store to complete the installation. If you run into trouble, click "Having trouble installing from the store? Try manual installation".
 2. Confirm the connection
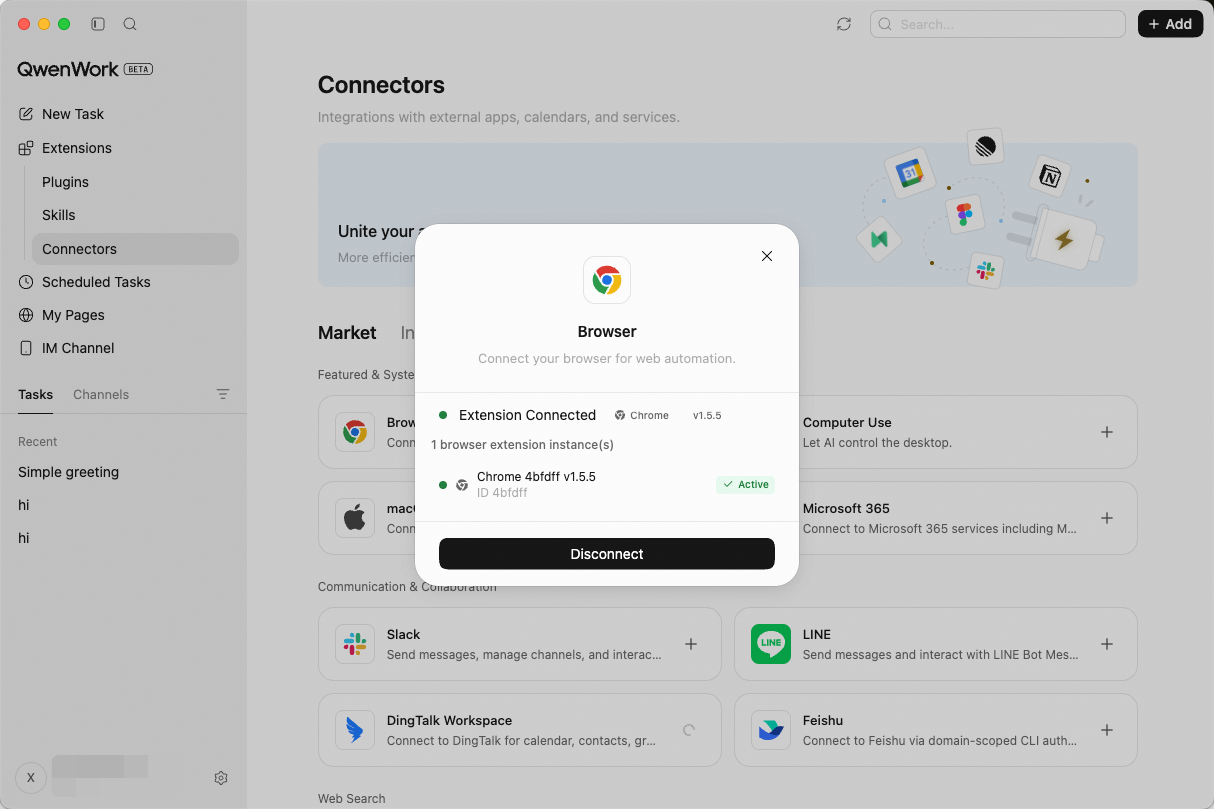
Once the extension is installed and enabled, the dialog status changes to Extension connected and shows the connected browser instance — the connection is complete.
2. Confirm the connection
Once the extension is installed and enabled, the dialog status changes to Extension connected and shows the connected browser instance — the connection is complete.
Data collection and research
Web information extraction
Industry news collection
Bulk form filling
macOS Apps lets QwenWork directly read and write data from native apps on your Mac, turning your Calendar, Mail, Reminders, and more into a workbench the AI can operate.
Under Extensions in the left sidebar, click Connectors, find macOS Apps, and enable the following apps individually as needed:
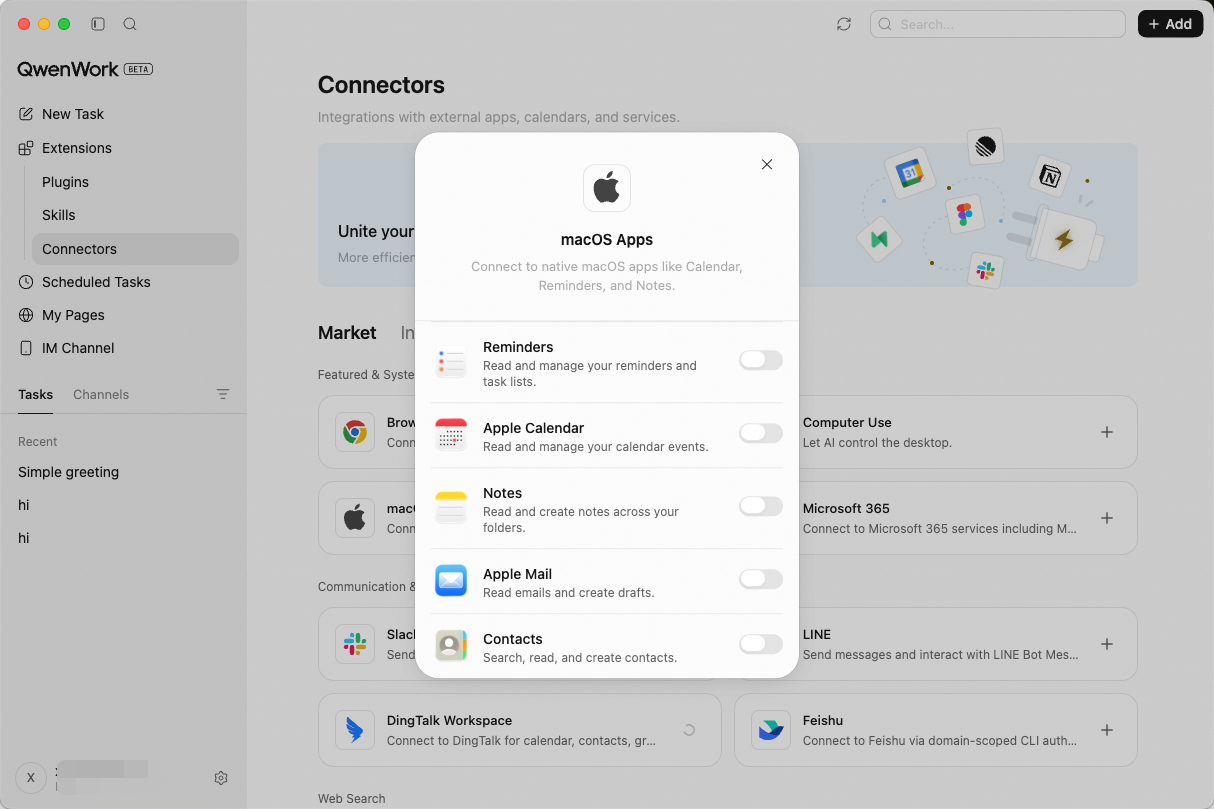 Reminders — Reads and manages your Reminders lists. The AI can create tasks, set due dates, and mark completion status, acting as your to-do management assistant.
Calendar — Reads and manages calendar events. The AI can review today's schedule, create new events, and check for time conflicts, helping you plan your day.
Notes — Reads and creates notes. The AI can save important information from conversations, meeting minutes, and quick ideas directly to Notes.
Mail — Reads email and creates drafts. The AI can summarize unread messages, extract key information, and draft replies, reducing the time you spend in your inbox.
Contacts — Searches, reads, and creates contacts. The AI can quickly look up contact details and organize contact data in bulk.
Reminders — Reads and manages your Reminders lists. The AI can create tasks, set due dates, and mark completion status, acting as your to-do management assistant.
Calendar — Reads and manages calendar events. The AI can review today's schedule, create new events, and check for time conflicts, helping you plan your day.
Notes — Reads and creates notes. The AI can save important information from conversations, meeting minutes, and quick ideas directly to Notes.
Mail — Reads email and creates drafts. The AI can summarize unread messages, extract key information, and draft replies, reducing the time you spend in your inbox.
Contacts — Searches, reads, and creates contacts. The AI can quickly look up contact details and organize contact data in bulk.
Manage your schedule in one sentence
Smart email summaries
Cross-app information integration
Microsoft 365 lets QwenWork directly access and manage your Microsoft account data. Once enabled, the AI can help you handle Outlook email, arrange your calendar, manage to-dos, and more.
Before first use, you need to authorize your account:
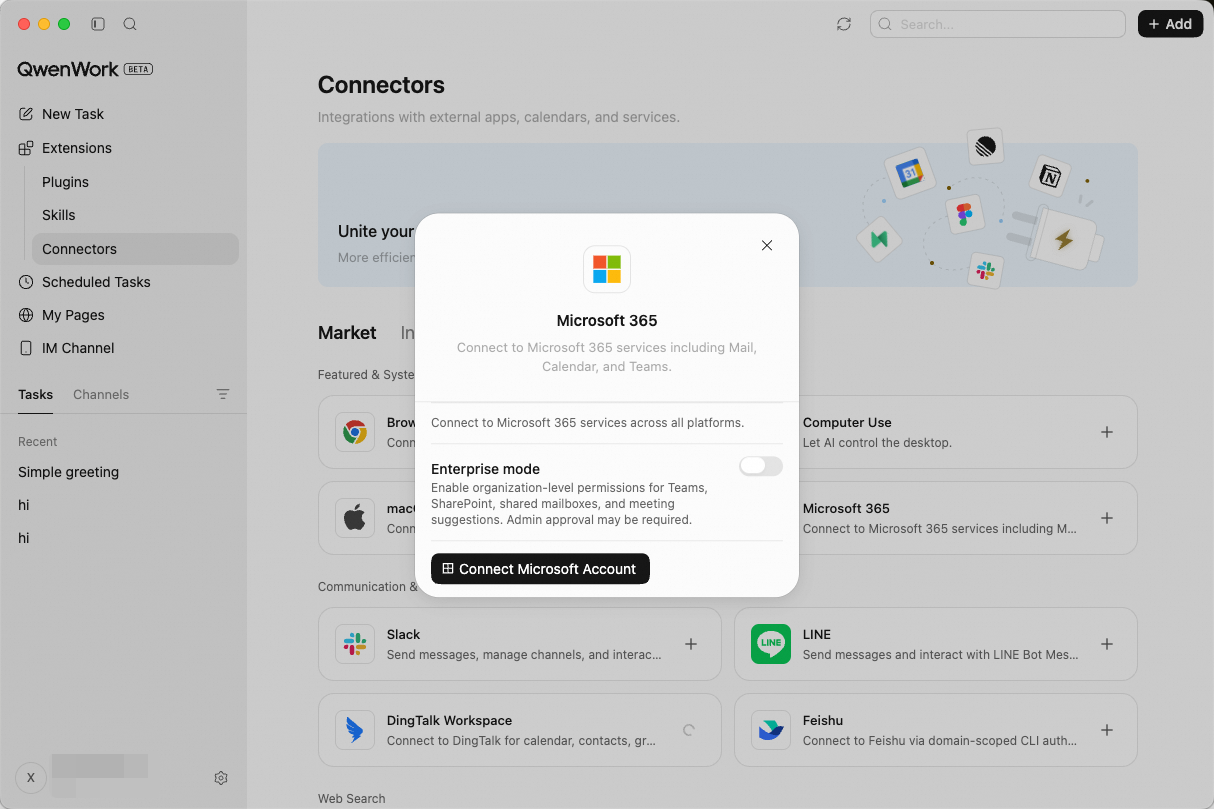 2. In the browser window that opens, sign in to your Microsoft account.
3. Read the permissions request page carefully (such as "QwenWork MS365 Connector needs your permission..."). Once you confirm authorization, it is ready to use.
2. In the browser window that opens, sign in to your Microsoft account.
3. Read the permissions request page carefully (such as "QwenWork MS365 Connector needs your permission..."). Once you confirm authorization, it is ready to use.
After signing in, you can enable the following services individually as needed:
Mail — Reads, sends, and manages Outlook email and drafts. The AI can summarize your inbox, draft replies, or find specific emails.
Calendar — Reads and manages Outlook calendar events and meetings. The AI can review your schedule and create new meeting invitations.
Contacts — Reads and manages Outlook contacts. The AI can quickly find contact details for colleagues or clients.
To Do — Manages personal tasks and task lists (Microsoft To Do). The AI can add to-dos and mark them complete.
Notes — Accesses OneNote notebooks, sections, and pages. The AI can record meeting minutes or extract note content.
Files — Browses and manages OneDrive files and Excel data. The AI can find documents in the cloud or read spreadsheet data.
Handling email and schedules
Cross-platform task management
DingTalk connects QwenWork to your organization's DingTalk: instead of clicking through multi-level menus item by item, you can complete workflows such as creating To-Dos, submitting or drafting reports, and handling attendance and calendar events in natural language (the exact scope depends on what your enterprise administrator has enabled).
In everyday work, handling matters in DingTalk usually requires tedious steps: finding the right app, clicking into the details, filling in a form, and submitting it. The Connector lets QwenWork connect directly to the DingTalk Workbench (DWS), compressing these "multi-click" operations that span multiple pages into "one-sentence" natural-language instructions — keeping you in your current work context.
Subject to what your enterprise administrator has enabled, the Connector can operate more than ten DingTalk modules through a large language model. Typical capabilities include:
1. Open the DingTalk Connector
Under Extensions → Connectors in the left sidebar, switch to the Marketplace tab, find DingTalk, and click the card.
2. Sign in to your DingTalk account
The Sign in to DingTalk dialog appears. Read the permission description, then click Sign in to DingTalk at the bottom to complete authorization.
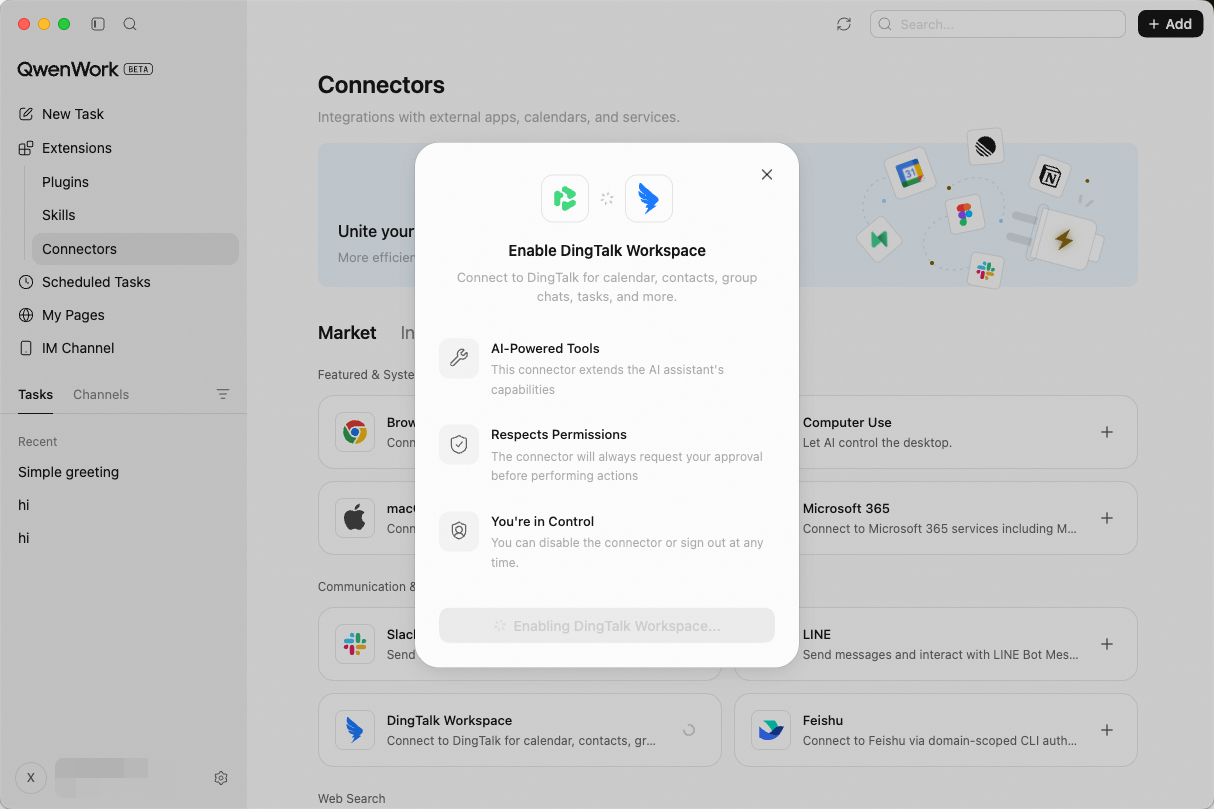 3. Confirm the installation
Once authorization is complete, view or manage the connector under Installed.
After completing the steps above, you can operate To-Dos, reports, attendance, calendar, approvals, and more in natural language (subject to the capabilities your enterprise has enabled).
3. Confirm the installation
Once authorization is complete, view or manage the connector under Installed.
After completing the steps above, you can operate To-Dos, reports, attendance, calendar, approvals, and more in natural language (subject to the capabilities your enterprise has enabled).
Create a DingTalk To-Do
Draft a daily report
MCP (Model Context Protocol) is an open protocol that standardizes how AI applications connect to external tools and data sources. Think of it as the "USB port" of the AI world — just as USB makes all kinds of peripherals plug-and-play, MCP lets AI call a wide variety of external services in a unified way.
Before MCP, AI assistants could only answer questions based on the conversation context. With MCP, QwenWork can directly operate your calendar, query documents, fetch map information, and more — truly becoming an assistant that can "take action".
MCP uses a client-server architecture:
Open the QwenWork desktop client and go to Extensions → Connectors in the left sidebar. Click + Add in the upper-right corner of the page, and choose one of the following two methods:
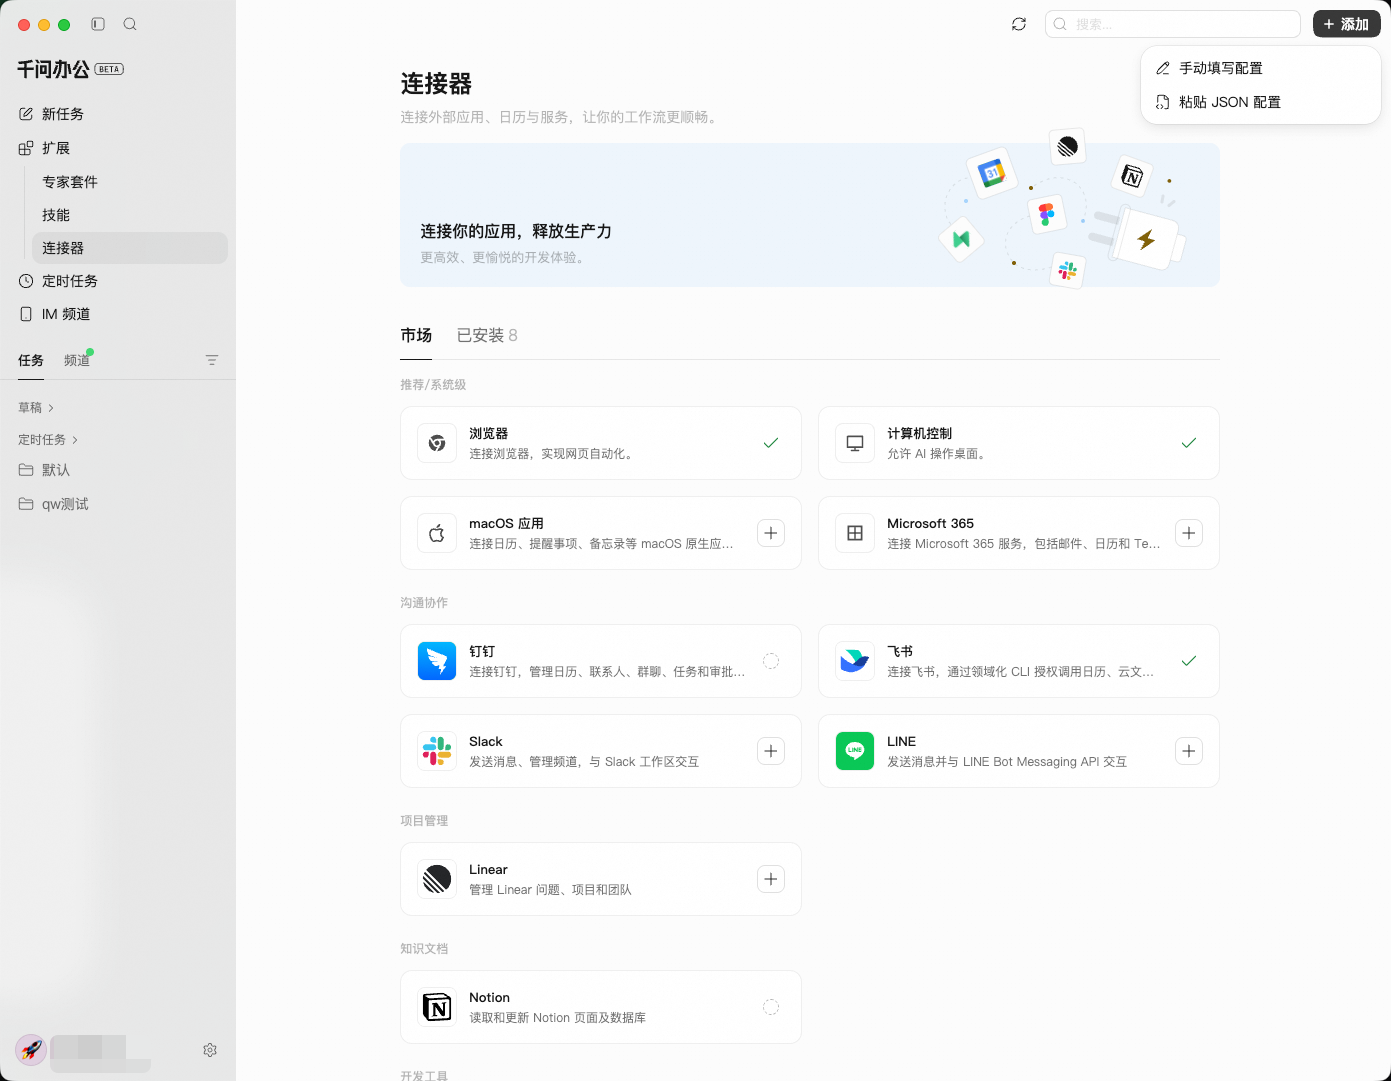
Best for cases where you copy a JSON configuration directly from an MCP marketplace. Click + Add → Paste JSON configuration; the Import via JSON dialog appears — paste the configuration and click Import.
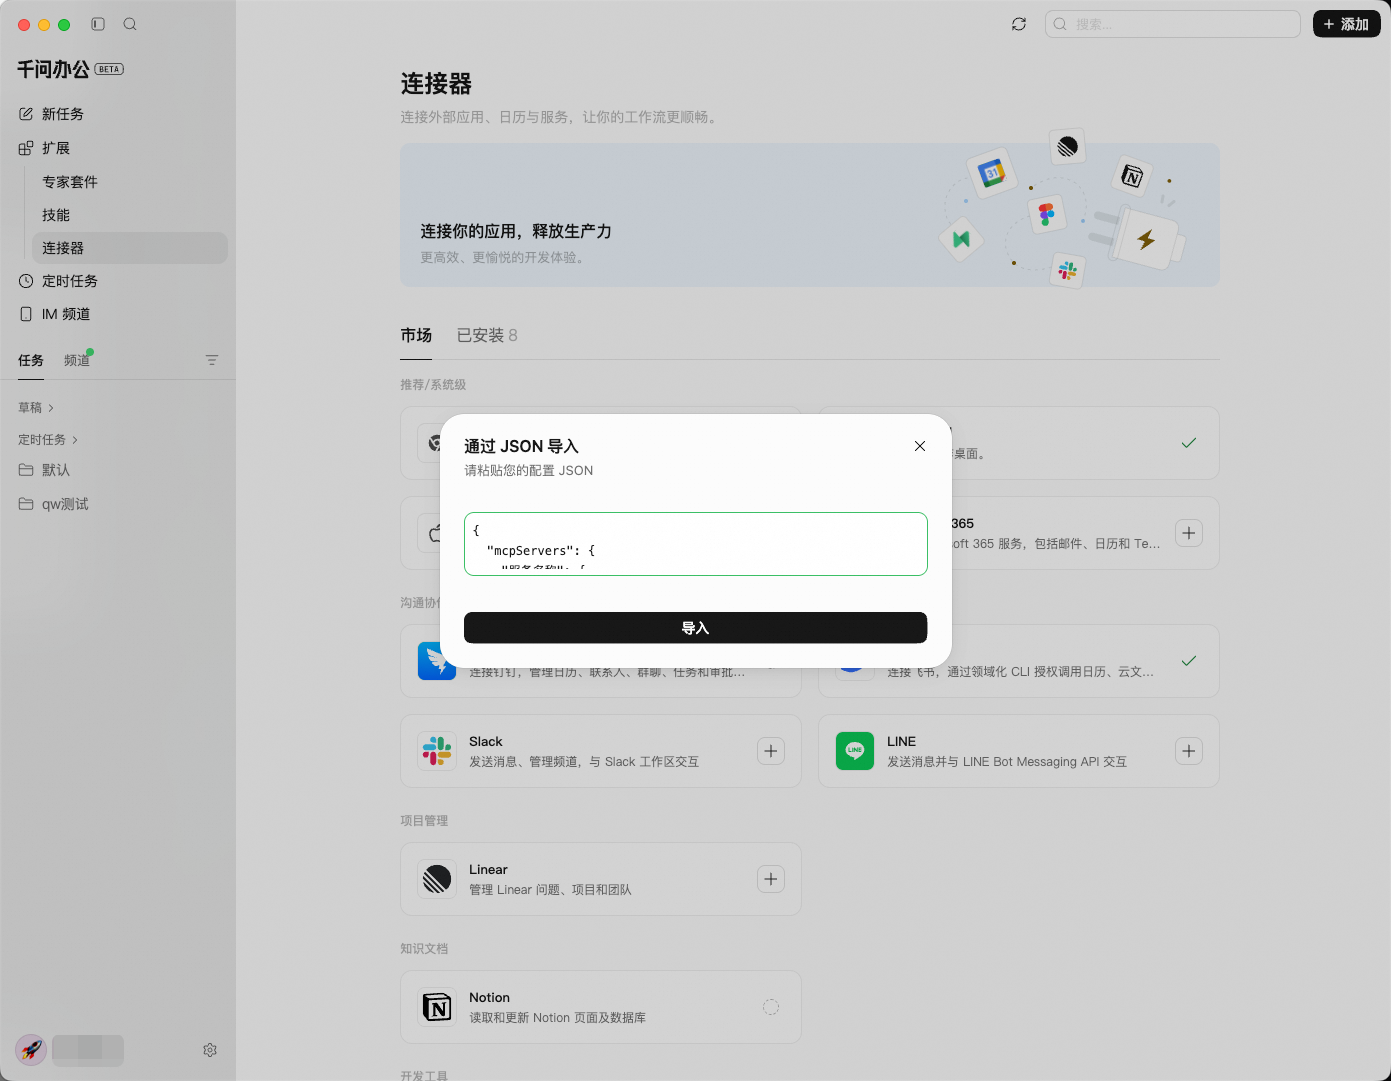 Example JSON configuration format:
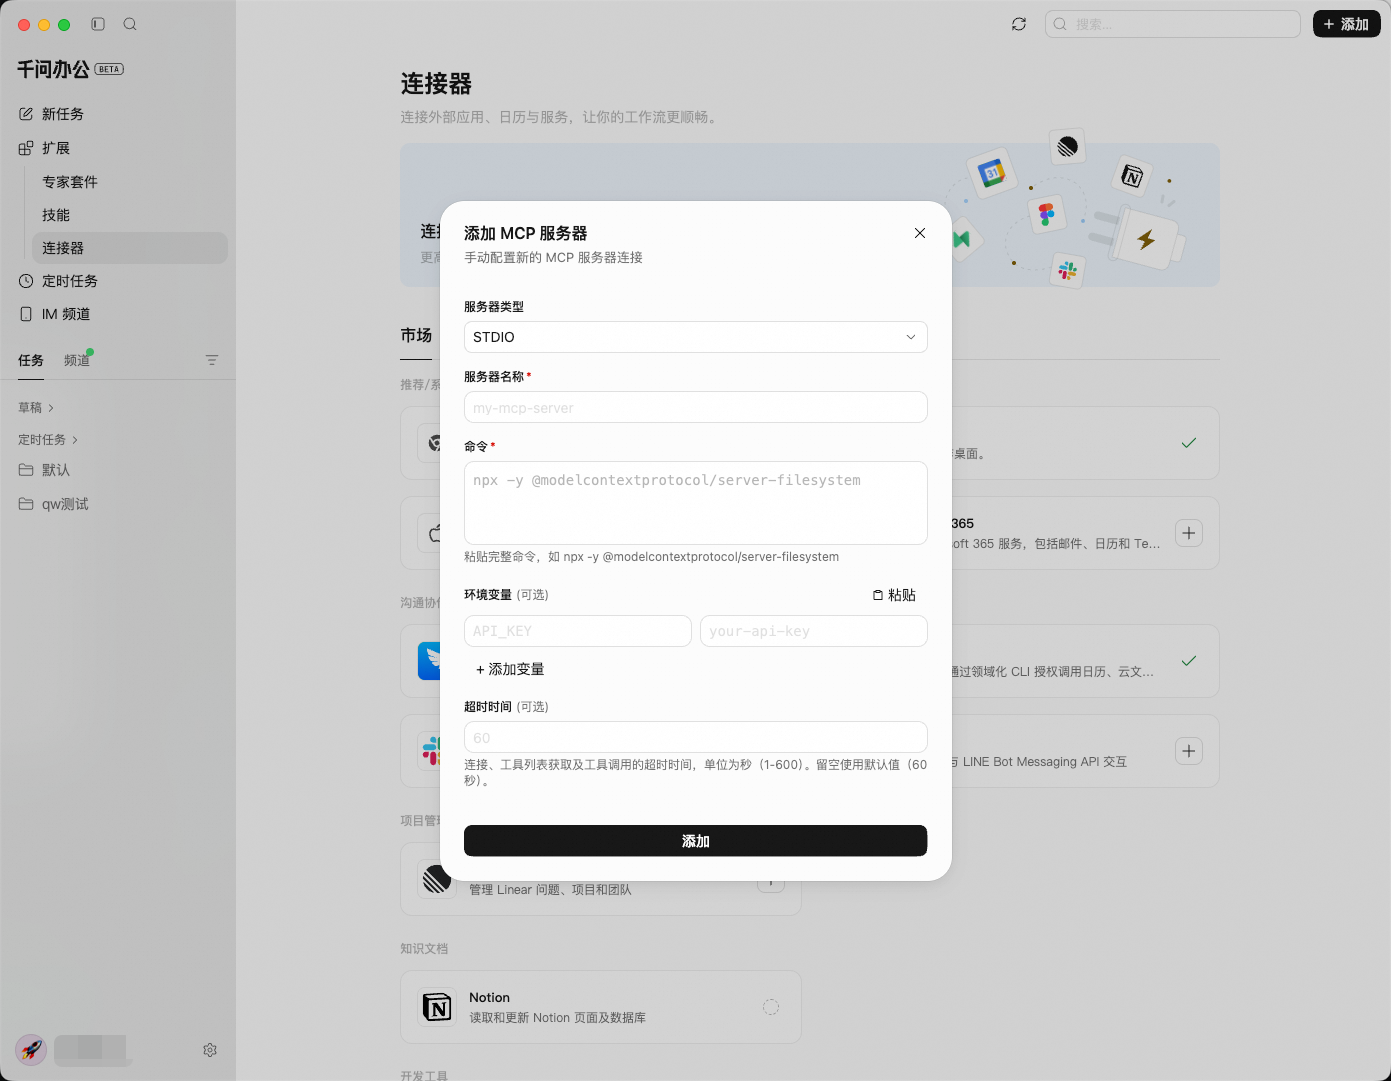
Best for cases where you fill in the service configuration by hand. Click + Add → Fill in configuration manually. In the "Add MCP Server" dialog that appears, first choose a type from the Server type dropdown. Different types correspond to different configuration forms:
Open the Connectors page and switch to the Installed tab. Added MCP services appear in the Custom section. You can:
When multiple types of Connectors are enabled at the same time, QwenWork can collaborate across apps within a single task:
Browser + Calendar
Browser + Mail
Full-feature collaboration
Scheduled Tasks
When using the Browser connector, providing the target URL directly in your prompt is faster and more accurate than letting the AI search for it on its own. For example, say "Open https://analytics.google.com" rather than "Find Google Analytics for me".
Connectors can work together with QwenWork's local file capabilities. You can have the AI scrape data from a web page and save it as a local Excel file, or read a local document and then bulk-fill forms on a website.
For complex workflows that involve multiple page jumps, we recommend first guiding the AI through the entire process in a regular conversation. Once the steps are confirmed, solidify the prompt into a Skill or Scheduled Task for reuse.
When you encounter steps the AI can't complete on its own, such as CAPTCHAs or QR-code sign-ins, you can take over at any time. After you complete the verification manually, the AI continues with the rest of the task in the signed-in state.
After enabling a Connector, the conversation says the related tools can't be found?
Right after enabling or disabling a Connector, you need to create a new conversation task for it to take effect. Please don't continue asking in the original conversation.
What if I encounter a sign-in page or CAPTCHA?
QwenWork can't automatically pass complex image CAPTCHAs, SMS verification, or QR-code sign-ins. When the AI navigates to such a page, simply complete the verification manually, and the AI will continue once sign-in succeeds.
What if a macOS app permission was denied?
If you clicked Deny when the dialog first appeared, you need to grant the permission manually: open System Settings → Privacy & Security, find the corresponding permission category (Calendar, Reminders, etc.), and add QwenWork to the allowed list.
Is it normal for browser operations to be slow?
The Browser connection needs to perceive page content in real time, which involves screenshots and element analysis, so it is slightly slower than pure conversation. Network conditions and page complexity both affect execution time. For data-heavy tasks, we recommend describing the steps in stages in your prompt, letting the AI complete them step by step.
What if an MCP doesn't work after being added?
What if MCP service calls are delayed?
Response times for MCP services depend on the service provider. Most services return results within a few seconds. If timeouts persist, check your network environment or contact the service provider.
Connectors
Without Connectors, QwenWork can only handle conversations and local files; with Connectors, it can help you get work done across apps and systems. QwenWork offers multiple ways to connect to external systems. All Connectors are configured and managed in one place under Extensions → Connectors in the left sidebar, and fall into two main categories:
Built-in Connectors
- Browser: Controls your browser for web operations, data extraction, and automated form filling.
- macOS Apps: Reads and writes data from native Mac apps — Calendar, Reminders, Notes, Mail, and Contacts.
- Microsoft 365: Reads and writes Outlook email, calendar, to-dos, contacts, OneNote notebooks, and OneDrive files.
Integration Marketplace
In the in-app marketplace, you can install and connect enterprise collaboration platforms and third-party SaaS tools with one click. Integrations in the productivity section include DingTalk, Feishu (Lark), Notion, Linear, Todoist, Canva, Supabase, Vercel, Neon, Slack, Figma, Google Calendar, Google Maps, LINE, Qichacha, and more.
All Connectors are turned off by default. QwenWork gains the corresponding access only after you explicitly complete authorization and configuration.
Browser
Browser lets QwenWork control your browser — opening pages, clicking buttons, extracting data, and filling in forms.
Why you need it
Much of daily work involves repetitive operations in the browser: logging into a back-office system every day to export data, checking competitors' prices on a regular basis, or copying information back and forth between multiple pages. These tasks aren't difficult, but they are time-consuming and error-prone. Browser lets you describe what you need in a single sentence, and the AI completes the entire workflow automatically.
Core capabilities
- Shared login state: Runs in a browser you are already signed into — no need to re-enter account names and passwords.
- Natural-language driven: No crawler code or recorded scripts required; just describe what you want in everyday language.
- Page awareness and interaction: The AI can "see" the page structure, understand elements such as buttons, forms, and lists, and perform clicks, typing, scrolling, selection, and other operations.
- Data extraction and organization: Extracts structured data from web pages and outputs it as tables, Markdown, or files.
- Multi-tab operation: Can work with multiple tabs at the same time, switching between pages and comparing data.
Quick setup
1. Install the browser extension
Under Extensions in the left sidebar, click Connectors, find Browser in the recommended list, and click +. When the dialog opens with the status Waiting for extension, click Install from Chrome Web Store to complete the installation. If you run into trouble, click "Having trouble installing from the store? Try manual installation".
Typical scenarios
Data collection and research
macOS Apps
macOS Apps lets QwenWork directly read and write data from native apps on your Mac, turning your Calendar, Mail, Reminders, and more into a workbench the AI can operate.
Supported apps
Under Extensions in the left sidebar, click Connectors, find macOS Apps, and enable the following apps individually as needed:
Typical scenarios
Manage your schedule in one sentence
Microsoft 365
Microsoft 365 lets QwenWork directly access and manage your Microsoft account data. Once enabled, the AI can help you handle Outlook email, arrange your calendar, manage to-dos, and more.
Quick setup
Before first use, you need to authorize your account:
- In QwenWork, go to Extensions → Connectors in the left sidebar, find Microsoft 365, and click Connect Microsoft Account.
Supported apps
After signing in, you can enable the following services individually as needed:
Mail — Reads, sends, and manages Outlook email and drafts. The AI can summarize your inbox, draft replies, or find specific emails.
Calendar — Reads and manages Outlook calendar events and meetings. The AI can review your schedule and create new meeting invitations.
Contacts — Reads and manages Outlook contacts. The AI can quickly find contact details for colleagues or clients.
To Do — Manages personal tasks and task lists (Microsoft To Do). The AI can add to-dos and mark them complete.
Notes — Accesses OneNote notebooks, sections, and pages. The AI can record meeting minutes or extract note content.
Files — Browses and manages OneDrive files and Excel data. The AI can find documents in the cloud or read spreadsheet data.
Typical scenarios
Handling email and schedules
DingTalk Workbench
DingTalk connects QwenWork to your organization's DingTalk: instead of clicking through multi-level menus item by item, you can complete workflows such as creating To-Dos, submitting or drafting reports, and handling attendance and calendar events in natural language (the exact scope depends on what your enterprise administrator has enabled).
Why you need it
In everyday work, handling matters in DingTalk usually requires tedious steps: finding the right app, clicking into the details, filling in a form, and submitting it. The Connector lets QwenWork connect directly to the DingTalk Workbench (DWS), compressing these "multi-click" operations that span multiple pages into "one-sentence" natural-language instructions — keeping you in your current work context.
Core capabilities
Subject to what your enterprise administrator has enabled, the Connector can operate more than ten DingTalk modules through a large language model. Typical capabilities include:
- To-Do management: For example, type "finish reviewing the three tables by 8 PM today", and the AI automatically parses the time and content and creates a To-Do. You can also view your To-Do list, change completion status, or update goals directly in the conversation window, without leaving the editor.
- Report filling: Say goodbye to manual compilation. QwenWork automatically gathers your To-Dos and the work you did during the day (such as submission records and task progress), organizes them into a cleanly formatted report, and pushes it to DingTalk with one click. Weekly and monthly reports work the same way — no page switching or opening report templates required.
- Attendance and calendar: Within the scope authorized by the Connector, initiate attendance check-ins, query shift schedules, or book and manage calendar events.
- Approval workflows: Subject to what your enterprise has enabled, quickly initiate or handle various approval flows (the specifics depend on the configuration on the DingTalk side).
Quick setup
1. Open the DingTalk Connector
Under Extensions → Connectors in the left sidebar, switch to the Marketplace tab, find DingTalk, and click the card.
2. Sign in to your DingTalk account
The Sign in to DingTalk dialog appears. Read the permission description, then click Sign in to DingTalk at the bottom to complete authorization.
Typical scenarios
Create a DingTalk To-Do
Custom MCP Services
MCP (Model Context Protocol) is an open protocol that standardizes how AI applications connect to external tools and data sources. Think of it as the "USB port" of the AI world — just as USB makes all kinds of peripherals plug-and-play, MCP lets AI call a wide variety of external services in a unified way.
Before MCP, AI assistants could only answer questions based on the conversation context. With MCP, QwenWork can directly operate your calendar, query documents, fetch map information, and more — truly becoming an assistant that can "take action".
How it works
MCP uses a client-server architecture:
- MCP client: QwenWork itself, responsible for initiating requests and presenting results.
- MCP server: Deployed by service providers (such as DingTalk and AMap), responsible for executing the actual operations and returning data.
Add an MCP service
Open the QwenWork desktop client and go to Extensions → Connectors in the left sidebar. Click + Add in the upper-right corner of the page, and choose one of the following two methods:
Paste JSON configuration
Best for cases where you copy a JSON configuration directly from an MCP marketplace. Click + Add → Paste JSON configuration; the Import via JSON dialog appears — paste the configuration and click Import.
Fill in the configuration manually
Best for cases where you fill in the service configuration by hand. Click + Add → Fill in configuration manually. In the "Add MCP Server" dialog that appears, first choose a type from the Server type dropdown. Different types correspond to different configuration forms:
Streamable HTTP / SSE
Remotely hosted MCP services, accessed via URL. Most services offered by MCP marketplaces are of this type. Configuration is simple, and this is the recommended first choice.- Server name: Give the service an easily recognizable name.
- Server address: Paste the URL copied from the MCP marketplace.
- Headers (optional): If the service requires authentication, click + Add Header to add request headers (for example,
Authorization: Bearer your-token). You can also click Paste to import them in bulk from the clipboard.
STDIO
MCP services that run locally and are launched from the command line. Suitable for developers using local tools or command-line integrations; the corresponding runtime environment (such as Node.js or Python) must already be installed on your machine.- Server name: Give the service an easily recognizable name.
- Command: Paste the complete launch command, such as
npx -y @modelcontextprotocol/server-filesystem. - Environment variables (optional): Environment variables the service needs at runtime (such as API keys and access tokens). Click + Add Variable to add key-value pairs one by one, or click Paste to import them in bulk from the clipboard.
Manage MCP services
Open the Connectors page and switch to the Installed tab. Added MCP services appear in the Custom section. You can:
- Enable or disable a service with its toggle.
- Expand a service to view the list of tools it provides.
- Click the edit icon to modify its configuration, or click the delete icon to remove the service.